Interface NotificationConfig
priority?: NotificationPriority;
sticky?: boolean;
title?: string;
text?: string;
color?: string;
smallIcon?: string;
largeIcon?: string;
layout?: string;
strings?: Record<string, string>;
actions?: string[];
channelName?: string;
channelId?: string;
}
Index
Properties
Optionalpriority
Android notification priority
Android requires a persistent foreground-service notification.
The priority option controls both:
- The order of the notification in the system shade.
- The position/visibility of the small status-bar icon.
The following values are defined as static constants on BackgroundGeolocation:
| Value | Description |
|---|---|
| NotificationPriority.Default | Weighted toward the top of the notification list; status-bar icon left-aligned. |
| NotificationPriority.High | Strongly weighted to the top; icon strongly left-aligned. |
| NotificationPriority.Low | Weighted toward the bottom; icon right-aligned. |
| NotificationPriority.Max | Equivalent to NOTIFICATION_PRIORITY_HIGH. |
| NotificationPriority.Min | Strongly weighted to the bottom; icon hidden. |
Optionalsticky
Configure the Android Foreground Service icon and notification to be displayed always. Defaults to false.
The default behaviour is for the notification to be shown only while the SDK detects the device to be moving.
Some developers desire to provide full-disclosure to their users when the SDK has been enabled.
Optionaltitle
Configure the title of the persistent notification in the Notification Bar.
Defaults to the application name from AndroidManifest. Android requires a persistent notification for foreground-services. This will configure the title of that notification.
Optionaltext
Configure the text of the persistent notification in the Notification Bar.
Defaults to "Location service activated". Android requires a persistent notification for foreground-services. This will configure the text of that notification.
Optionalcolor
Configure the color of the persistent notification icon in the Notification Bar.
Defaults to null. Android requires a persistent notification for foreground-services. This will configure the color of the notification icon (API >= 21).
Supported formats are:
#RRGGBB#AARRGGBB
Optionalsmall
Configure the small icon of the persistent notification in the Notification Bar.
Android requires a persistent notification in the Notification Bar. This allows you customize that icon. Defaults to your application icon.
⚠️ Warning:
- You must specify the
type(drawable|mipmap) of resource you wish to use in the following format:{type}/icon_name - Do not append the file-extension (eg:
.png)
Optionallarge
Configure the large icon of the persistent notification in the Notification Bar.
Android requires a persistent notification in the Notification Bar. This allows you customize that icon. Defaults to your application icon.
⚠️ Warning:
- You must specify the
type(drawable|mipmap) of resource you wish to use in the following format:{type}/icon_name - Do not append the file-extension (eg:
.png)
Optionallayout
Custom Android Notification Layout
Specifies the name of your custom Android Layout XML file.
ℹ️ See:
- Android Custom Notification Layout for full setup instructions.
![]()
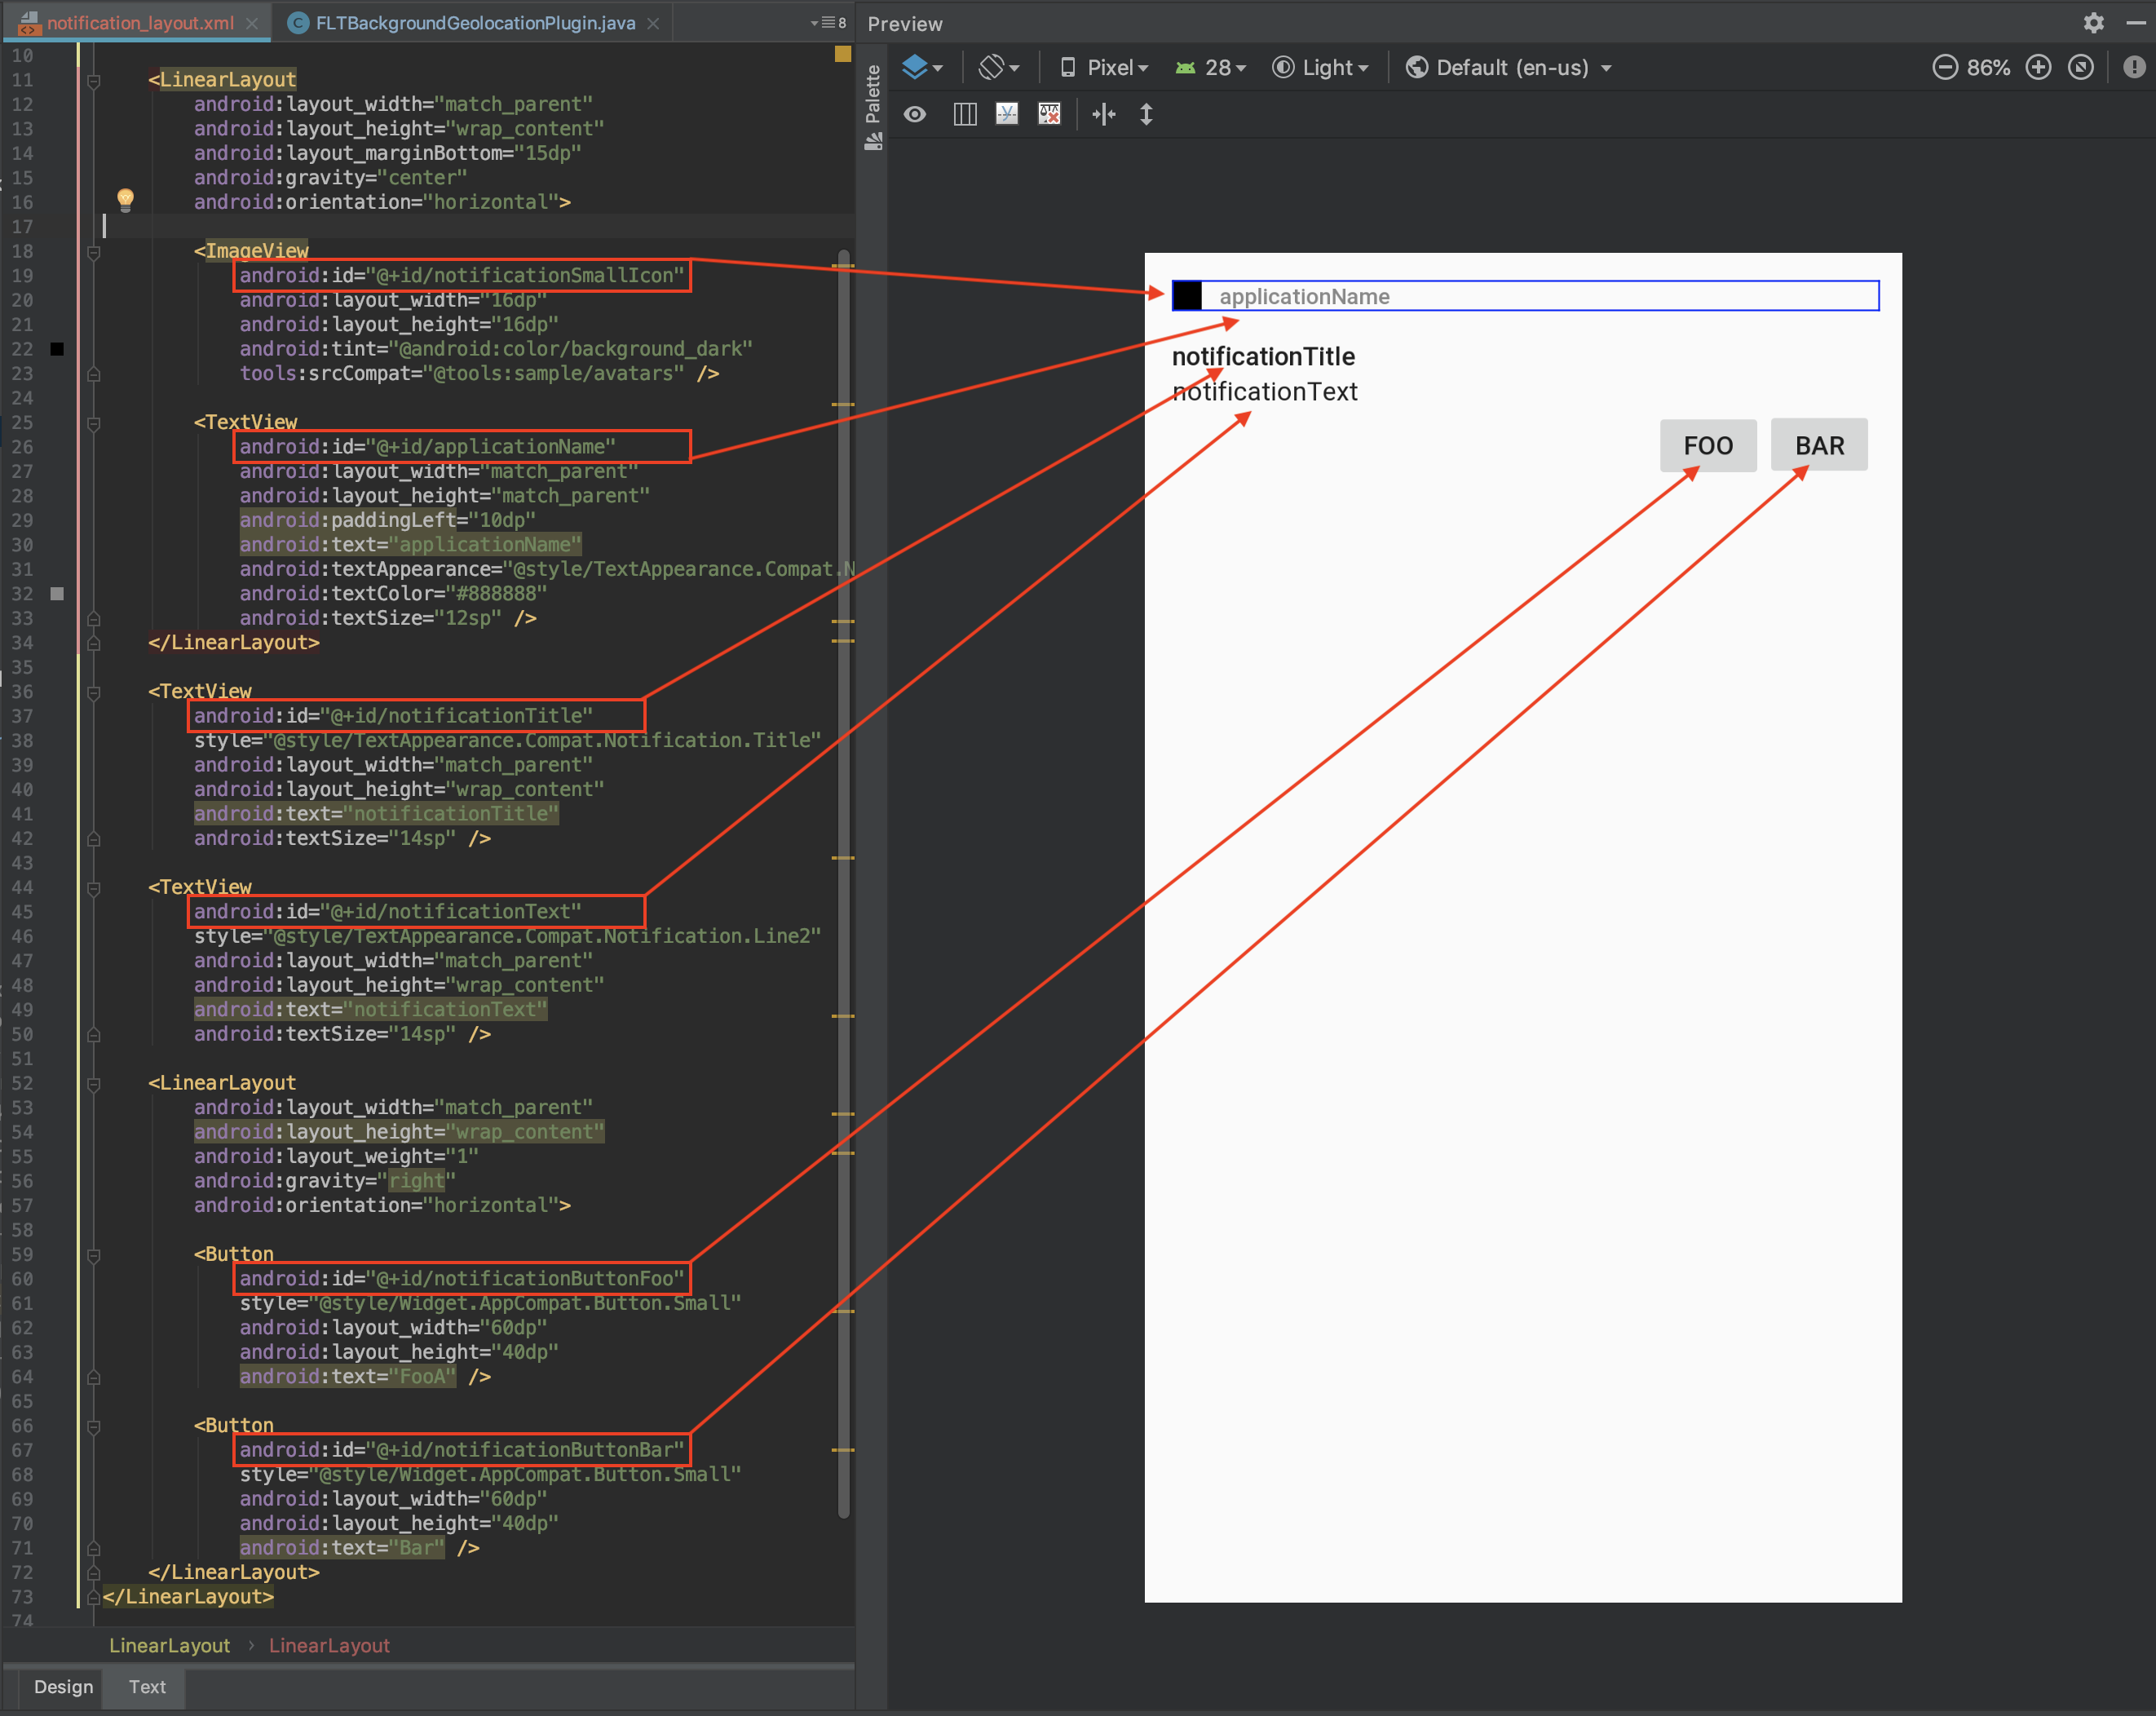
Even if you have no prior Android UI experience, custom layouts are very approachable.
You will typically add <TextView />, <ImageView />, and <Button /> elements.
Important: Your android:id values must be prefixed with notification
(e.g., notificationText, notificationTitle).
The only exception is applicationName, which the SDK will populate with your app name.
Layout Special Elements
When the SDK renders your custom notification, it searches for the following IDs and sets their content from the associated data source:
Layout element android:id |
Data source |
|---|---|
applicationName |
Application name from AndroidManifest |
notificationTitle |
title |
notificationText |
text |
notificationSmallIcon |
smallIcon |
notificationLargeIcon |
largeIcon |
Example
BackgroundGeolocation.ready({
app: {
notification: {
layout: "my_notification_layout",
title: "The Notification Title",
text: "The Notification Text",
smallIcon: "mipmap/my_small_icon",
largeIcon: "mipmap/my_large_icon"
}
}
});
Custom <TextView /> Elements
You may define your own custom text fields and populate them using strings.
Example
<TextView
android:id="@+id/myCustomElement"
android:layout_width="match_parent"
android:layout_height="wrap_content"
android:text="notificationTitle" />
Example
BackgroundGeolocation.ready({
app: {
notification: {
strings: {
myCustomElement: "My Custom Element Text"
}
}
}
});
Custom <Button /> Elements
Define your own buttons and register click listeners using actions.
Example
<Button
android:id="@+id/notificationButtonFoo"
style="@style/Widget.AppCompat.Button.Small"
android:layout_width="60dp"
android:layout_height="40dp"
android:text="Foo" />
Example
BackgroundGeolocation.ready({
app: {
notification: {
actions: [
"notificationButtonFoo",
"notificationButtonBar"
]
}
}
});
BackgroundGeolocation.onNotificationAction((buttonId) => {
console.log("[onNotificationAction]", buttonId);
switch (buttonId) {
case "notificationButtonFoo":
break;
case "notificationButtonBar":
break;
}
});
Sample Layout
As a starting point, copy this into your XML file:
Example
<?xml version="1.0" encoding="utf-8"?>
<LinearLayout xmlns:android="http://schemas.android.com/apk/res/android"
xmlns:tools="http://schemas.android.com/tools"
android:layout_width="match_parent"
android:layout_height="135dp"
android:gravity="start"
android:orientation="vertical"
android:padding="15dp">
<LinearLayout
android:layout_width="match_parent"
android:layout_height="wrap_content"
android:layout_marginBottom="15dp"
android:gravity="center"
android:orientation="horizontal">
<ImageView
android:id="@+id/notificationSmallIcon"
android:layout_width="16dp"
android:layout_height="16dp"
android:tint="@android:color/background_dark"
tools:srcCompat="@tools:sample/avatars" />
<TextView
android:id="@+id/applicationName"
android:layout_width="match_parent"
android:layout_height="match_parent"
android:paddingLeft="10dp"
android:text="applicationName"
android:textAppearance="@style/TextAppearance.Compat.Notification.Title"
android:textColor="#888888"
android:textSize="12sp" />
</LinearLayout>
<TextView
android:id="@+id/notificationTitle"
style="@style/TextAppearance.Compat.Notification.Title"
android:layout_width="match_parent"
android:layout_height="wrap_content"
android:text="notificationTitle"
android:textSize="14sp" />
<TextView
android:id="@+id/notificationText"
style="@style/TextAppearance.Compat.Notification.Line2"
android:layout_width="match_parent"
android:layout_height="wrap_content"
android:text="notificationText"
android:textSize="14sp" />
<LinearLayout
android:layout_width="match_parent"
android:layout_height="wrap_content"
android:gravity="right"
android:orientation="horizontal">
<Button
android:id="@+id/notificationButtonFoo"
style="@style/Widget.AppCompat.Button.Small"
android:layout_width="60dp"
android:layout_height="40dp"
android:text="FooA" />
<Button
android:id="@+id/notificationButtonBar"
style="@style/Widget.AppCompat.Button.Small"
android:layout_width="60dp"
android:layout_height="40dp"
android:text="Bar" />
</LinearLayout>
</LinearLayout>
Using your custom layout
Example
BackgroundGeolocation.ready({
app: {
notification: {
title: "The title",
text: "The text",
layout: "notification_layout",
actions: [
"notificationButtonFoo",
"notificationButtonBar"
],
strings: {
myCustomTextBox1: "custom TextBox element"
}
}
}
});
BackgroundGeolocation.onNotificationAction((buttonId) => {
console.log("[onNotificationAction]", buttonId);
switch (buttonId) {
case "notificationButtonFoo":
break;
case "notificationButtonBar":
break;
}
});
Optionalstrings
Custom strings to render into <TextView /> elements of a custom notification [[layout]].
ℹ️ See Android Custom Notification Layout for setup instructions.
You can declare your own custom <TextView /> elements and render data into them using the notification.strings parameter.
Optionalactions
Declare click listeners for <Button /> elements of a custom notification layout.
![]()
ℹ️ See Android Custom Notification Layout for setup instructions.
You can declare custom Android <Button /> elements in your layout XML and
register click listeners for them using the actions parameter.
Example: Custom <Button /> element
<Button
android:id="@+id/notificationButtonPause" <!-- notificationButtonPause -->
style="@style/Widget.AppCompat.Button.Small"
android:layout_width="60dp"
android:layout_height="40dp"
android:text="Foo" />
Example: Register button listeners
BackgroundGeolocation.ready({
app: {
notification: {
actions: [
"notificationButtonPause" // <-- register button listeners
]
}
}
});
// Listen to custom button clicks:
BackgroundGeolocation.onNotificationAction((buttonId) => {
console.log("[onNotificationAction] - ", buttonId);
switch (buttonId) {
case "notificationButtonPause":
BackgroundGeolocation.changePace(false);
break;
// ...
}
});
Optionalchannel
Configure the name of the plugin's notification-channel used to display the required, persistent foreground notification.
On Android O+, the plugin's foreground-service needs to create a "Notification Channel". The name of this channel can be seen in:
Settings->App & Notifications->Your App.
Defaults to your application's name from AndroidManifest.
 \
\
Optionalchannel
Customize the notification channel ID.
Defaults to your.package.name.TSLocationManager
NOTE: It is not typically required to change this. Typical use-cases are for users who use an existing Android foreground-service who wish the SDK to share an existing notification and channel.
Android foreground notification
Android requires a persistent notification whenever the SDK runs its foreground service. This notification is shown in the system status bar while tracking is active.
Configure this via NotificationConfig on AppConfig.notification.
Example
Custom Notification Layouts
Supply a custom Android Layout XML file using NotificationConfig.layout. This allows complete control over the appearance of the foreground notification.
See the guide:
Android Custom Notification Layout — (github:wiki/Android-Custom-Notification-Layout)